
Wednesday, November 30, 2011
Turkey Shmurkey
Well, obviously I haven't posted in awhile so I missed out posting my Thanksgiving meal. It was pretty low key - just me the wife and the dog...and about 10 pounds of ham.

Wednesday, November 16, 2011


Monday, November 14, 2011
Get Baked!
I always say I am half Irish and half Italian and that my stomach resides in my Italian half.


Manicotti:
Italian food has been a big part of my life - from my grandmother's homemade pizza and cannelloni to my mother's slow cooked spaghetti sauce to any Italian hoagie I can wrap my gluttonous little fingers around. I enjoy preparing Italian dishes almost as much as I enjoy eating them. Though this was my first attempt at making manicotti - and of course I had to try and twist the classic recipe and serve up something tasty and visually unique.
RECIPE: Baked Manicotti w/ Ground Lamb and Roasted Red Peppers (this recipe will make a lot - probably enough for 6-8 people - or a lot of leftovers)

 |
| What's cooking an Italian dinner without a little vino to aid in the process? |
First things first. Let's get the sauce started. I like to make a very easy red sauce that goes well with most any pasta dish.
Sauce - (this is just the base of the sauce - so add your own spices to dress it up as you like, because I know sauce can be a very personal thing. I will often add red wine if I have it, perhaps a touch of
balsamic vinegar if the sauce is seeming too sweet. And always have
some basil, oregano and garlic and onion powder on hand to tweak to taste):
- 3 14.5 oz. Cans of Diced Tomatoes (if you don't want it too 'chunky' get crushed tomatoes)
- 1 Small - Finely Diced Onion (white or yellow work just fine, but I like the bite you get from a red onion)
- 1/4 Cup Extra Virgin Olive Oil - and another 1 tbsp. of olive oil for sauteing onions
- 3 Cloves Garlic Minced
- Salt to taste
- First saute the onions in a tablespoon of olive oil and a sprinkle of salt for 5 minutes or so.
- Toss in your garlic and stir that around and saute for another minute or two
- Now add your tomatoes and olive oil and bring to a boil
- Reduce heat to let simmer for 30-40 minutes stirring occasionally
- NOTE: use a potato masher to smash down the tomatoes to get all the juice out and make it more of a 'sauce' consistency - you will want to to this a few times because it will get easier as the tomatoes cook down.
- Always season to taste - add spices to make it your own and figure out what you like.
 |
| CAUTIONARY TALE: Knife safety is paramount! My onions aren't as finely or evenly diced as I typically like because while cutting them I was distracted for a second and then proceeded to cut my thumb fairly severely - though nothing a little super glue couldn't handle. (FYI - this was not due to the wine) |

Manicotti:
- 1 Package of Manicotti
- 15 Oz. Ricotta Cheese (I mistakenly grabbed the low fat kind and would highly recommend the full fat version)
- 2 1/2 Cups Shredded Mozzarella (reserve a little to sprinkle on top of the dish)
- 1/2 Cup Grated Parmesan or Romano - 1/2 for manicotti filling and half to sprinkle on top while baking
- 1/4 Cup Chopped Fresh Parsley
- 12 Oz. Ground Lamb
- 1 Jar of Roasted Red Peppers - Drained and Finely Chopped
- 1 Egg (helps to bind everything together)
- 1 tsp. dried rosemary
- 1/3 Cup Panko for bake topping
- Salt to taste
- Cook Manicotti according to package instructions
- Brown lamb in skillet with rosemary and pinch of salt
- Mix all cheeses, peppers, egg, parsley, and lamb in bowl
- Transfer mix into pastry bag or large Ziploc bag. If using Ziploc bag cut small piece of one of the corners off so you can use it to fill the pasta tubes more easily
- Take your 9X13 baking dish and coat bottom with some of your tomato sauce
- Fill manicotti tubes with mixture and lay flat in bottom of dish. (you will see I did it a bit differently below, but trust me this is the easier way to do it)
- Once all tubes are filled pour remaining sauce over top and cover the dish in foil and toss in 350 degree oven.
- Cook for 30 Minutes - remove foil sprinkle remaining cheese and panko on the top and bake for 15 more minutes...and that's it.
 |
| Brown lamb - lightly salt while cooking |
 |
| Mix together lamb, red peppers, ricotta, Parmesan, mozzarella, egg and parsley and mix until well blended |
 |
| Cover bottom of baking dish with tomato sauce |
 |
| Fill pastry bag or large Ziploc bag with filling mixture. If using Ziploc bag cut small piece of one of the corners off so you can use to fill the pasta tubes more easily. |
 |
| My visual twist turned out to be a pain in the ass. Instead of filling the manicotti tubes and laying them flat on the bottom (traditional style), I decided to cut them in half prior to filling and then stand them up in the pan and fill them upright. It was very tedious and rather frustrating. While I was happy with the end product, doing it again I would prepare it more traditionally and then perhaps cut them and stand them up on the plate after it was baked. |
 |
| Last 15 minutes in the oven - topped with cheese and panko |
|
| Final plate - I also served a simple salad of baby spinach with a blue cheese and balsamic vinegar dressing. |
Tuesday, November 8, 2011
Awwww...Shrimp Yeah!
Coconut Shrimp w/ Spicy Apricot Dipping Sauce and Sesame Vegetable Noodles

| I thought it was about time for me to fry something. I typically don't like to fry foods, for apparent health reasons, and the fact that it makes my apartment smell like a clown-shoed burger joint. So, this is one of my first forays into fried food, and let me tell you, it's pretty freaking easy. For me, when cooking anything I am not familiar with I look for a basic recipe to base my meal on and then add my own twists here and there. For the coconut shrimp I found a really simple recipe by the Queen-of-all-things-fried - Ms. Paula Deen. I thought who better to base my dish on than a woman who has built an empire off of her deep fryer. Her dipping sauce called for orange marmalade, and being that I was not born in the 1800s, I don't really care for the stuff. So instead, I opted for an Apricot preserve to get that similar sweet, citrus flavor. Coconut Shrimp w/ Dipping Sauce:
|
Sesame Noodles:
- 12 oz. Linguine
- 1 Red Pepper
- 4 Green Onions
- 1/4 Cup Soy Sauce
- 3 tbsp. Sesame Oil
- 1 tbsp. Chili Oil or Chili Sauce w/ garlic
- 2 tbsp. Red Wine Vinegar
- 1 1/2 tbsp. Sugar
- 1 tsp. Toasted Sesame Seeds
- Cook Linguine
- Slice Red Peppers and green onions into thin strips
- Mix together - Soy sauce, vinegar, sesame oil, chili oil and vegetable oil, along with the sugar. I suggest mixing it in a saucepan over low heat. It will help the sugar dissolve.
- Toss linguine, peppers, onions, and sauce into a bowl and mix together well. Cover with plastic wrap and store in refrigerator. I would suggest letting it set for at least a couple of hours, although making it the day before allows all the flavors to really come together. Serve it up and top with sesame seeds.
 |
| For the coating - first prepare your batter - which consists of flour, water and baking powder. Then in a separate container mix your shredded coconut and panko. Then simply dip shrimp first into the flour and water mixture and then move into coconut mixture. Be sure to press firmly into coconut to be sure it sticks well. |
 |
| Coated shrimp - prior to frying |
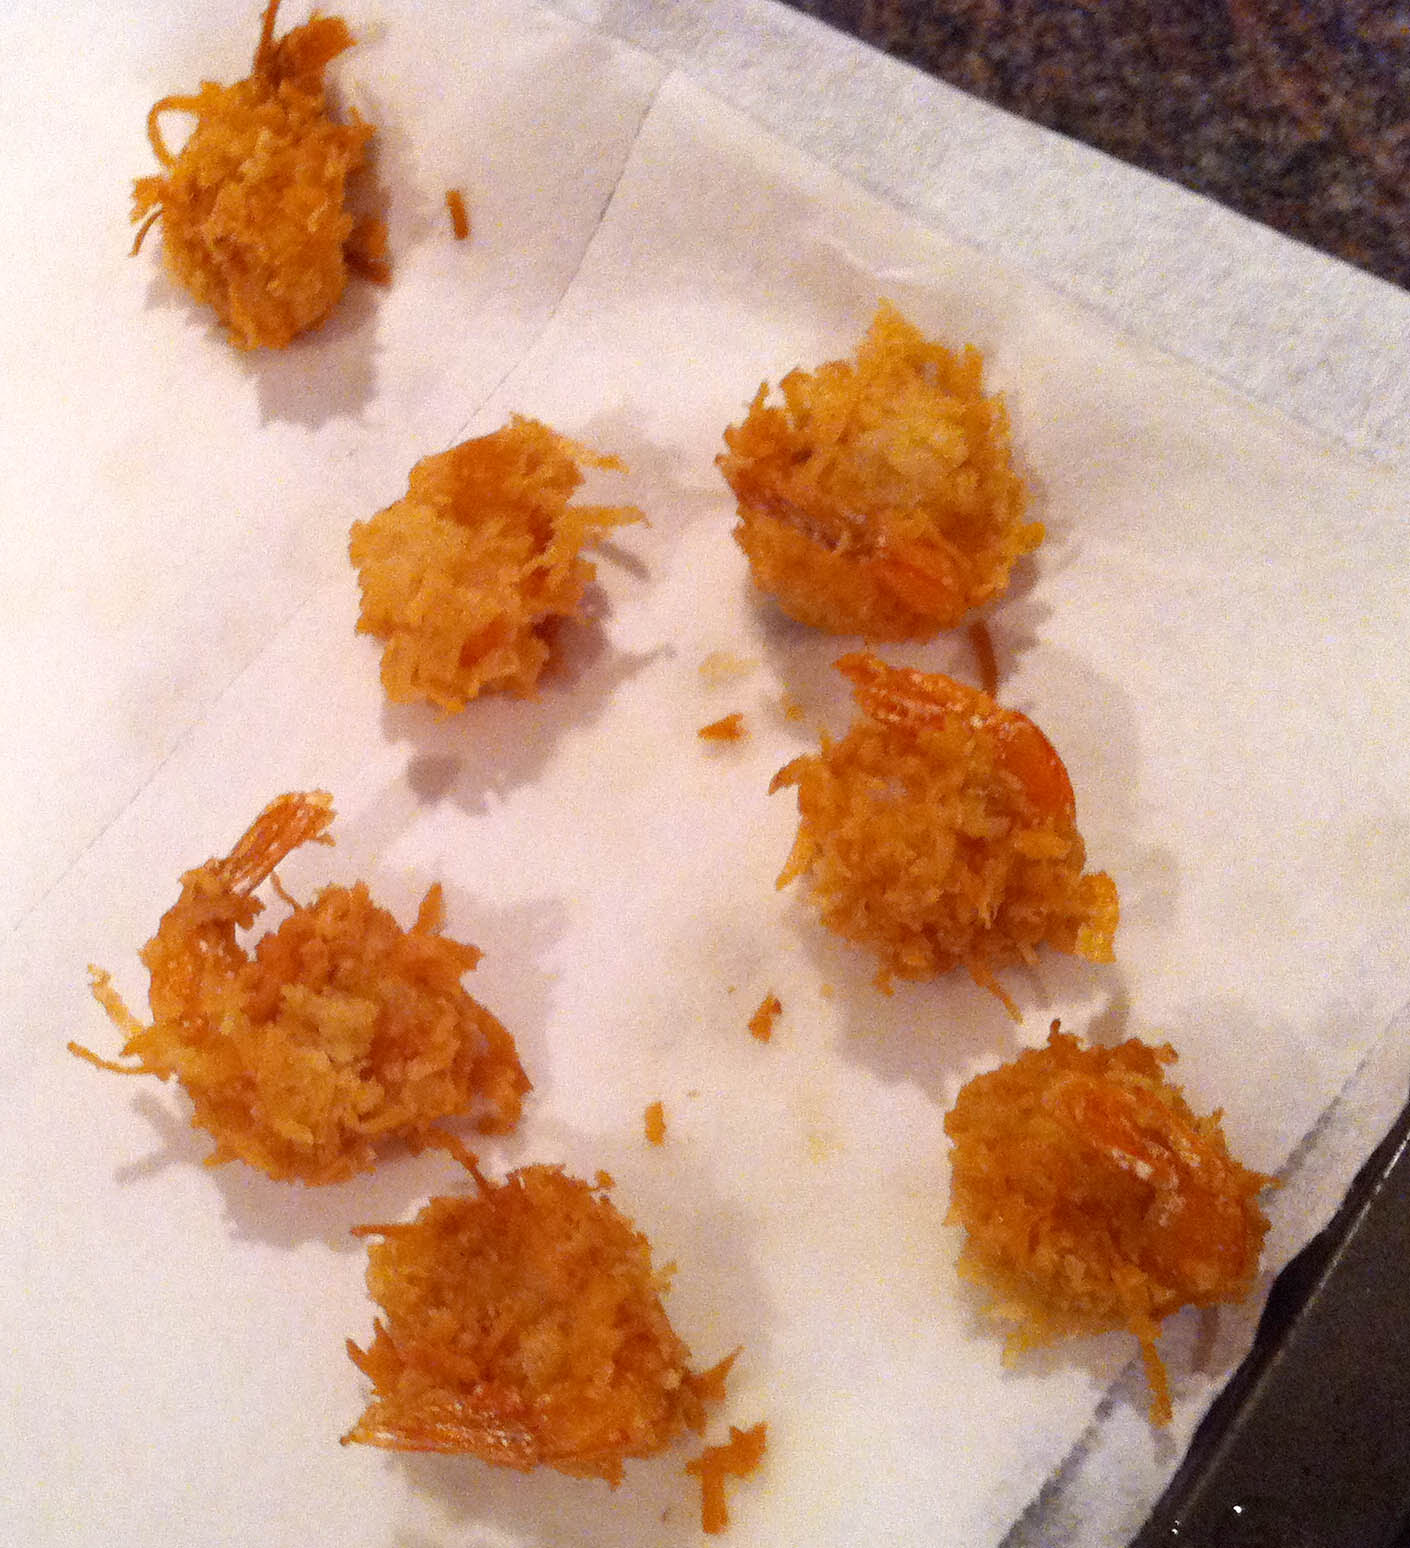 |
| Batch of fried shrimp resting on paper towels to soak up some of the excess oil. |
 |
| Dipping Sauce - combine Apricot preserves with red wine vinegar and crushed red pepper a cook over low heat until thouroughly blended together |
 |
| For Sesame Noodles - chop up a small to medium sized red pepper in small strips - and do the same with 4 green onions. |
 |
| Then combine cooked linguine, red peppers, green onions and sauce in large bowl. Cover and put into the refrigerator. This can be made a day in advance if you choose, it only gets better the longer it sits. |
 |
| Final Plate - Coconut shrimp with dipping sauce spooned on - and sesame noodles topped with a pinch of toasted sesame seeds. |
Sunday, November 6, 2011
Grown-Up Grilled Cheese
Now there is nothing wrong with a Kraft single between two slices of white bread. But c'mon, there comes a time to grow it up a bit and pretend that your tastebuds aren't just for show.

Now this is just a super simple grilled cheese - but can be made any thousands of different ways. For this I used sliced swiss and gouda cheese, with a spread of mayo and whole grain mustard to add a little spice and creaminess.
 |
| Spread the mayo and mustard on. |
 |
| After you've added your sliced cheese close the sandwich and butter the bread on both sides and then press grated Parmesan onto the outside of the bread and toss in a preheated skillet and cook until both sides are golden brown and the cheese is melted throughout. |
 |
| The Parmesan really creates an amazing crunch on the bread. |
 |
| Now that's some food porn. |
Roast that Bird
Well, turkey day is only a couple weeks away, which is way too soon if you ask me - this year has flown by. But that is no reason not to throw a pre-turkey day bird in the oven. A plump whole roast chicken is a nice treat that is a lot easier to prepare than you might think.

Don't be intimidated to roast yourself a delicious bird. It just feels GOOD to pull a beautifully roasted whole chicken out of the oven and let the succulent steam fill the kitchen. Add some potatoes and a nice fresh salad and you have yourself a truly classic meal.
So if you eye whole birds on sale at your local grocer then take one down and put a little love in your oven.
If you purchase a commercial whole chicken just follow the cooking instructions on the packaging for times and temperature. It's usually something like for a 6-8 lb. chicken you roast at 350 degrees for 2 - 2.5 hours until a meat thermometer inserted into the thickest part of the chicken reaches 180 degrees. Just season the exterior of the chicken however you like, prior to putting in over.

I chose what I feel to be a more classic seasoning. Salt, Pepper, Garlic Powder, Onion Powder, Herbs de Provence and a little olive oil - seasoned both outside and inside the cavity
 |
| Take your bird out of the packaging and remove the giblets packet inside. Then rinse the whole bird inside and out under cold water. Pat dry with a clean, dry kitchen towel. (This one happens to have a 'built-in-thermometer, which is handy - though I would still check temp with your own meat thermometer). |
 |
| Seasoned Butter for stuffing under the skin - mix butter with salt, pepper, onion & garlic powder, and herbs of Provence |
 |
| Lift the skin up around the breast area and ever so gently separate it from the meat - then with your hand, push clumps of the seasoned butter under the skin as far as you can go. Try and distribute butter under the skin as evenly as possible |
 |
| Finish seasoning the outside of the bird with the same seasonings as in the butter - also season the interior cavity. I also lightly coated the exterior of the bird with olive oil. Then tie the legs together at the joint with kitchen twine (make sure to wet twine prior to tying legs) . Then toss into an oven preheated to 350 and cook for 2-2.5 hours ever so often scooping up pan drippings and pouring back over the bird to help season and get a nice crispy skin as it's roasting. |
 |
| Side Dish: (FIRST - bake potatoes in oven until a fork can easily be inserted into the side) Then take your baked potatoes and slice them in half to finish cooking in preheated skillet with melted butter. |
 |
| Smash down a bit to get good contact with pan |
 |
| Potato topping - sauteed onion, garlic, and jalapeno |
 |
| add a little cheese at low temp until just melted and then toss on top of potatoes |
 |
| Final Plate - slice of chicken breast and a leg - potatoes topped with cheesy onion mix then topped with sour cream - all finished with a simple salad of romaine, tomatoes, and red onion w/ bleu cheese dressing. |
Don't be intimidated to roast yourself a delicious bird. It just feels GOOD to pull a beautifully roasted whole chicken out of the oven and let the succulent steam fill the kitchen. Add some potatoes and a nice fresh salad and you have yourself a truly classic meal.
Subscribe to:
Posts (Atom)